1. Are your eyes deep dark brown? This is the darkest level of brown. In some women their eyes almost appear black. Most eye makeup colors that are in the medium to dark color range will work for you. The one problem this eye color has is that your eye makeup can sometimes look too dark or harsh. For that reason it’s important to use the lighter flecks of color in your eyes to select highlight colors. The contrast between the darker colors and highlight will set off your color best.
2. Are your eyes medium brown? This is truly the easiest color of all to work with. You can wear any color. Mauves, violets and purples all look great on you. You can go the opposite and wear golds, coppers and bronzes. Greens look outstanding on you. If you want to use color, but in a subtle way then use it to line your eyes. Try dramatic looks or multiple colors on your eyes when you want something different.
3. Are your eyes light brown? Light brown eyes are unexpectedly striking. Do you have golden flecks in your eyes? If so then remember to use a very pale yellow as a highlight. The one thing you need to be careful of is not to overpower your brown shade. Limit the darker shadows to use in the crease area. While other colors of brown might enjoy black eyeliner you may want to consider a dark brown instead.
4. Are your eyes so light they look hazel? This is a level that looks great with colors that are just a little darker than your normal skintone would be. Champagne and mauve colors look great with hazel eyes. The key to making hazel really stand out is to line them with another color such as a violet, bronze or dark brown. Apricot or pink highlight works well with this color, too. Pass on black eyeliner because it tends to overpower hazel.
Read More
Showing posts with label makeup tips. Show all posts
Showing posts with label makeup tips. Show all posts
Tuesday, January 24, 2012

Beauty Tip: Save a Cracked Eyeshadow
So my inspiration for this post was that my beloved Carbon eyeshadow broke during my most recent move. Luckily, there is a way to fix your broken shadows, so you don’t have to go spend money on a new one!
1.Crush up all of the remaining shadow in the pot (I know, how scary!) until it reaches a powdery consistency. The finer you crush the shadow, the nicer it will turn out in the end.
2.Pour a little rubbing alcohol into the shadow pot with the crushed eyeshadow and stir until it is a thick paste. If you happen to pour too much, you will just have to wait longer for it to all evaporate, but its not the end of the world. If you didn’t know rubbing alcohol can be found at your local drug store for around $2.00.
3. Due to all the stirring you have just done, the surface of the eyeshadow might not be flat. To flatten it out, simply but carefully drop the eyeshadow pot onto a table or other hard surface, until it flattens out.
4. Next you wait 2-3 hours, or until the shadow is almost all the way dry.
5. Once the shadow is mostly dry, place a tissue over the shadow and place a coin over the tissue and press down on the coin to tightly compact the eyeshadow.
6. And then you have a brand new eyeshadow!
Source
1.Crush up all of the remaining shadow in the pot (I know, how scary!) until it reaches a powdery consistency. The finer you crush the shadow, the nicer it will turn out in the end.
2.Pour a little rubbing alcohol into the shadow pot with the crushed eyeshadow and stir until it is a thick paste. If you happen to pour too much, you will just have to wait longer for it to all evaporate, but its not the end of the world. If you didn’t know rubbing alcohol can be found at your local drug store for around $2.00.
3. Due to all the stirring you have just done, the surface of the eyeshadow might not be flat. To flatten it out, simply but carefully drop the eyeshadow pot onto a table or other hard surface, until it flattens out.
4. Next you wait 2-3 hours, or until the shadow is almost all the way dry.
5. Once the shadow is mostly dry, place a tissue over the shadow and place a coin over the tissue and press down on the coin to tightly compact the eyeshadow.
6. And then you have a brand new eyeshadow!
Source
DIY makeup holder
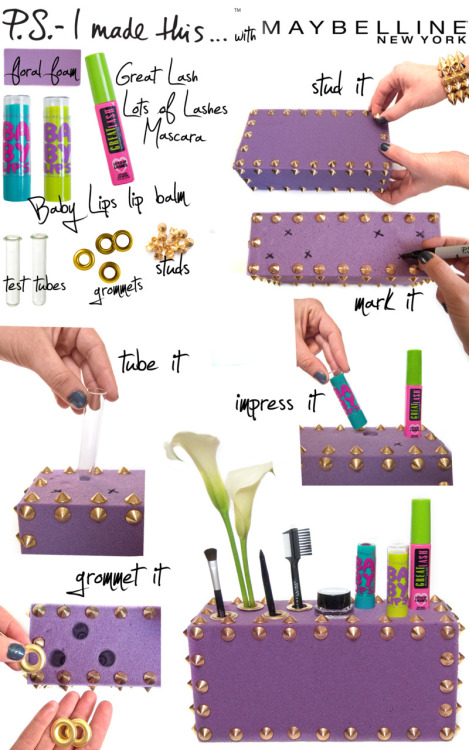
Department store cosmetic countertops should be called the land of decadent organization. Perfectly placed products look colorful and clean, which make us crave them even more. It’s time to roll out the red carpet for the new beauty starlet that’s on everyone’s lips, Maybelline New York’s Baby Lips Lip Balm. Never have we ever found a pout pleaser that has color, moisture, the cute-factor, and j’amazing packaging all in one. Baby Lips Lip Balm has inspired our DIY Beauty box! Due to it’s fun and fresh look, we want to display it, at eye level- everyday! The purple (aka “Peach Kiss”) case inspired the base for the beauty box of the same hue.
To create, use a block of floral foam (avail in lots of fun colors), and stud it up! Use a marker to plan out your beauty box placement. Use desired products to pierce the foam directly by applying a bit of pressure, and created a spot carved out specially for it. Make sure your Lip balms, mascaras, and other products have just enough depth to stand up straight and stay put. Push test tubes, all the way down, into foam so the top lip is flush with the foam’s surface. Insert makeup brushes. For a finished look, place grommets on top of the tubes opening. Turn a tube into a bud vase for that final touch!
You now have yourself the perfect lip pleaser and a countertop cosmetic solution. P.S.- Long live the Maybelline New York Beauty Box!
Source
Striking eyes, easily.
How do I make my eyes really stand out? Sound familiar? Probably because so many people ask me and it probably pops up on your dashboard a lot, if you also struggle with trying to make your eyes pop and reach their full potential, keep on reading!
- Don’t line the waterline of the eye unless it’s for a theatrical, editorial or party look, otherwise you just risk eye infection and it never looks natural. White/fleshy toned eyeliner is an exception as it can open up the eye.
- Avoid lining the bottom lash line. This can also look really harsh on some people, if you do want to line the bottom lash line though use a brown eyeliner and only take it 3 quarters of the way in from the outer corner of the eye and smudge it a little bit,this still gives impact and makes them look more defined but it doesn’t look as harsh.
- Highlight the brown bone. Using a white highlighter on the brow will open up the eye area tremendously, ensure that you don’t use one with a slight pink undertone or it will look like you’ve just tweezed the area.
- Highlight the inner corner of the eye. Highlighting the inner corner of the eye with a white eyeshadow (shimmery or not) really helps to open up the eyes and make them pop, simply place a small amount right by the tear duct.
- Highlight the outer corner. Using a white highlighter just under your bottom lash line and taking it three quarters of the way in towards the inner corner of the eye,helps to make you look like you’ve had a good nights sleep!
- Use light toned eyeshadows. Using a light toned but pigmented eyeshadow always helps to make the eyes look larger while darker colours will make them look smaller. Opt for whites, creams, light beige’s, off whites, egg shell, and dusty rose tones for the best impact.
- Use Mascara. Mascara is probably one of the biggest eye openers out there, Whether you choose something clear, black or brown it will always open up the eyes. Ensure you wiggle the wand at the base of the root all the way to the tips of the lashes, for even more impact do your lower lashes to, but only apply one coat. Also make sure you curl the lashes before any application of eye lash products!
USE EYESHADOW SHADES THAT ARE BEST SUITED FOR YOUR EYE COLOUR!
Blue eyes should try: Gold, bronze, ash, taupe, grey, heather, slate, apricot, peach, and lilac tones.
Light Brown eyes should try: Rich dark brown, mocha, khaki, stone and bark tones.
Dark Brown eyes should try: Electric blue, Milky chocolate and dark chocolate tones, indigo, teal and white tones.
Green eyes should try: Purple,plum,beige,camel,slate, lilac and taupe tones. Green can be used but be cautious when using or switch it up with some green eyeliner instead.
Hazel eyes should try: Brown and pink tones.
Grey eyes should try: You can experiment the most as you almost have a blank canvas, but for added impact try bronze and grey tones. To avoid looking washed out avoid shades like white, and try darker tones.
Source
- Don’t line the waterline of the eye unless it’s for a theatrical, editorial or party look, otherwise you just risk eye infection and it never looks natural. White/fleshy toned eyeliner is an exception as it can open up the eye.
- Avoid lining the bottom lash line. This can also look really harsh on some people, if you do want to line the bottom lash line though use a brown eyeliner and only take it 3 quarters of the way in from the outer corner of the eye and smudge it a little bit,this still gives impact and makes them look more defined but it doesn’t look as harsh.
- Highlight the brown bone. Using a white highlighter on the brow will open up the eye area tremendously, ensure that you don’t use one with a slight pink undertone or it will look like you’ve just tweezed the area.
- Highlight the inner corner of the eye. Highlighting the inner corner of the eye with a white eyeshadow (shimmery or not) really helps to open up the eyes and make them pop, simply place a small amount right by the tear duct.
- Highlight the outer corner. Using a white highlighter just under your bottom lash line and taking it three quarters of the way in towards the inner corner of the eye,helps to make you look like you’ve had a good nights sleep!
- Use light toned eyeshadows. Using a light toned but pigmented eyeshadow always helps to make the eyes look larger while darker colours will make them look smaller. Opt for whites, creams, light beige’s, off whites, egg shell, and dusty rose tones for the best impact.
- Use Mascara. Mascara is probably one of the biggest eye openers out there, Whether you choose something clear, black or brown it will always open up the eyes. Ensure you wiggle the wand at the base of the root all the way to the tips of the lashes, for even more impact do your lower lashes to, but only apply one coat. Also make sure you curl the lashes before any application of eye lash products!
USE EYESHADOW SHADES THAT ARE BEST SUITED FOR YOUR EYE COLOUR!
Blue eyes should try: Gold, bronze, ash, taupe, grey, heather, slate, apricot, peach, and lilac tones.
Light Brown eyes should try: Rich dark brown, mocha, khaki, stone and bark tones.
Dark Brown eyes should try: Electric blue, Milky chocolate and dark chocolate tones, indigo, teal and white tones.
Green eyes should try: Purple,plum,beige,camel,slate, lilac and taupe tones. Green can be used but be cautious when using or switch it up with some green eyeliner instead.
Hazel eyes should try: Brown and pink tones.
Grey eyes should try: You can experiment the most as you almost have a blank canvas, but for added impact try bronze and grey tones. To avoid looking washed out avoid shades like white, and try darker tones.
Source
Subscribe to:
Posts (Atom)